Attention Bead and Button Show 2019 Kumistas!

Hello KUMISTAS!!

 Cindy Grayson Bead Fest Philly Kumihimo Class Instructor
Cindy Grayson (on the left) Bead and Button Show Kumihimo Class Instructor with some of her students

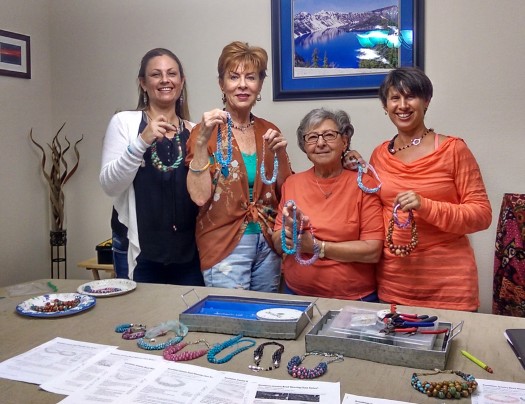
Here is a little introduction from Bead and Button Show 2019 Kumihimo Classes, instructor, Cindy Grayson along with a little reminder of the supplies we will use.

I would also like to use this platform for all of my students to join in on the comments section and start introducing yourselves to each other, ask questions and just get psyched to take these classes!! You may bring an important question to the table that I didn’t think of. This will help me to continue to prepare myself to set and realize expectations.

Let’s make this fun!

Comment with your name, where you are from, how long you have been kumihimo-ing, why you chose to take this class and what you hope to get out of it…

I’ll start. (p.s. I am so excited, I absolutely LOVE teaching, especially Kumihimo!!)

Come see me at my table on Wednesday night for “Meet the Teachers” I plan to have limited quantity kumihimo kits and discounted bundles put together for you.

Here is a link to an Amazon shopping list for the Kumihimo Toolkit supplies I suggest.
Many of these items can be purchased for a discount when you use your coupons at Michael’s Arts and Crafts (they also take competitor coupons and price match).

All students need to bring:

  • Kumihimo Disk
  • Wonder Clips (QTY:8, unless otherwise noted) (INSTEAD OF BOBBINS)
  • Kumihimo Weight (approx. 3.5 oz.)
  • Bead Fix LIQUID Adhesive (to stiffen cord ends)
  • G-S Hypo Cement (flexible bond adhesive for nub ends and smaller end caps)
  • Bead dishes
  • Scissors
  • Tape Measure
optional Supplies:
  • Bead Journal (click to read blog post) – you will hear me taking about this but may not need it until after the class
  • Bead Reamer (just in case, also good if you have trouble picking up beads)
  • Table Magnifier (if you need it. bring it! This can be the difference between an enjoyable or a stressful experience.)
  • A note about Bobbins… I know many of you are used to bobbins but personally, I do not recommend them for these projects. In my experience they fall off, especially when using any other beads besides seed beads. As always, it’s your class, your choice.

Class Expectations:

I can’t promise that you will finish your project in class. As you know, it is a lot of work and it really depends on you and your speed. I always emphasize with my students..

My classes focus on teaching specific TECHNIQUES…

(which are extracted from my 8-class Bead Runway Kumihimo Techniques Pattern Class Series) that allow you to expand your kumihimo horizon. With each new technique exploration and bead journal entry, you will begin to be more and more empowered to create your own patterns and use your own beads. This is where my invention the Bead Runway (patent pending) was created. An invention made from necessity. So first focus on learning new techniques, and second, on the finished piece. If you learn the techniques, you can remake this piece as many times as you want in as many variations as your brain will allow. I actually put my class series into a book , now available on Amazon. (Book Info)

OPPORTUNITY #1: If you show me your copy of my book, “Bead Runway Kumihimo Technique Pattern Series VOl I”, in class, I will give you a voucher for 40% OFF on Kumihimo project bead kits which include online classes from MadeYouLookDesign.com. These streaming web classes launch October 2019 and will continue on an on-going basis. 

Kit Supplies

All students will receive a kit that includes the pattern, beads, cording and findings you will need to create the project you have signed up for. 

Specific to Earth and Sea Graduated Necklace Class:
  • You get a Free Bead Runway!! and 12×12 iris case! The iris case is used to place your Bead Runway in to keep the beads from rolling off. Students also sometimes choose to bring a tray of some sort. Read this blog article for more information. We are going to learn how to layout a graduating size bead pattern in a way that you can make a pattern of your own, using your own beads in the future) (THIS CLASS IS A REVOLUTION IN KUMIHIMO PATTERN LAYOUT AND DESIGN, YOU will never be the same again after this class.)
  • You need to bring: 2 part epoxy, 8 bead dishes
  • You can choose your necklace length
Specific to Blue Steel Necklace Class:
  • There will be three design options of where to place the spacers, currently pictured in the front. They can be off to the sides also. Directions for all options will be provided.
  • You need to bring: basic jewelry tools: wire cutters, bead crimper, round nose pliers, flat nose pliers and needle nose pliers, 6-8 bead dishes
  • You can choose your necklace length
  • Matching Bracelet Kit: If you are interested in purchasing  beads for a matching bracelet, mention it in the comments. The kit will have to be reserved because I only have a limited number of these beads. These silver beads have unfortunately been discontinued.
Specific to Goddess Graduating Necklace Class featuring Jesse James Beads:
  • You get a Free Bead Runway!! and 12×12 iris case! The iris case is used to place your Bead Runway in to keep the beads from rolling off. Students also sometimes choose to bring a tray of some sort. Read this blog article for more information. We are going to learn how to layout a graduating size bead pattern in a way that you can make a pattern of your own, using your own beads in the future) (THIS CLASS IS A REVOLUTION IN KUMIHIMO PATTERN LAYOUT AND DESIGN, YOU will never be the same again after this class.)
  • We will be learning Alternating cords technique, using 2 different cord types, in order to incorporate different bead hole sizes.
  • Participants of this class get free access to a PDF pattern download featuring Jesse James beads as a beaded focal and kumihimo segments on the sides.
  • Discount for Jesse James Beads exclusive to this class
  • Surprise from Sarah James of Jesse James Beads!
  • Exact bead availability varies due to the limited production of each Jesse James Bead line, but I promise your projects will be beautiful and you will learn so much.
  • You need to bring: 28 Wonder Clips (yes, 28), 15 bead dishes, bead reamer for wood beads
  • You will have extra beads and Jesse James accent beads, if you want to make earrings, bring: Rose Gold ear wires, jump rings, headpins, basic jewelry tools like wire cutters, round nose pliers, flat nose pliers, needle nose pliers
  • You can choose your necklace length

OPPORTUNITY #2: If you take at least two of my classes at Bead and Button Show 2019, I will give you a Voucher for 50% off a copy of my new book, which automatically qualifies you for OPPORTUNITY #1.

Lots of exciting developments coming in the next year.. Here are a few..
(If you are interested in any of these, please mention it in your comment).

New Kumista Bead Strands

Classes at BeadFest Philly 2019 Get $25 OFF with Early Bird Registration

Can’t Make it to Philly? Reserve a kumihimo project kit

Are you a Kumihimo teacher? Teach the Bead Runway Technique Pattern Series! Join the 2020 Program Rollout! Message Me for Details and Upcoming Developments.

Follow my Kumihimo Blog for articles and updates on all of these exciting programs, deals, info and more.

cropped-front-cover-web.jpg
Kumihimo Kumista Konnection by Bead Runway
Closed group · 37 members

Click Here to Join My Facebook Group for Exclusive Offers, Opportunities and Support
Show off your Kumista status. Students of Bead Runway™ Kumihimo Technique Pattern Series post photos of the Kumihimo projects they want to share with …

Thank you!


Attention Bead Fest Philly Kumistas!

Hello KUMISTAS!!

 Cindy Grayson Bead Fest Philly Kumihimo Class Instructor
Cindy Grayson (on the left) Bead Fest Philly Kumihimo Class Instructor with some of her students

Here is a little introduction from Bead Fest Philly’s Kumihimo Classes, instructor, Cindy Grayson along with a little reminder of the supplies we will use.

I would also like to use this platform for all of my students to join in on the comments section and start introducing yourselves to each other, ask questions and just get psyched to take these classes!! You may bring an important question to the table that I didn’t think of. This will help me to continue to prepare myself to set and realize expectations.

Let’s make this fun!

Comment with your name, where you are from, how long you have been kumihimo-ing, why you chose to take this class and what you hope to get out of it…

I’ll start. (p.s. I am so excited, I absolutely LOVE teaching, especially Kumihimo!!)

Here is a link to an Amazon shopping list for the Kumihimo Toolkit supplies I suggest

I also wanted to mention a couple of things to set class expectations. I can’t promise that you will finish your project in class. As you know it is a lot of work and it really depends on you and your speed. I always emphasize with my students..

My classes focus on teach specific TECHNIQUES…

(which are extracted from my 8-class Bead Runway Kumihimo Techniques Pattern Series) that allow you to expand your kumihimo horizon. With each new technique exploration and bead journal entry, you will begin to be more and more empowered to create your own patterns and use your own beads. This is where my invention the Bead Runway (patent pending) was created. An invention made from necessity. So please focus on learning a new technique, not the finished piece. If you learn the technique, you can remake this piece as many times as you want in as many variations as your brain will allow. I am actually putting my class series into book volumes that will be available on amazon, and fingers crossed, my first volume is slotted to be out by Bead Fest! My debut! (info on http://www.beadrunway.com)

Class Supplies

All students will receive a kit that includes all the beads, cording and findings you will need to create the project you have signed up for. 

optional Supplies:
  • Bead Journal (read blog post) – you will hear me taking about this but may not need it until after the class
  • Bead reamer (just in case, also good if you have trouble picking up beads)
  • table magnifier (if you need it. bring it! This can be the difference between an enjoyable or a stressful experience.)
Specific to Earth and Sea Graduated Necklace Class:
  • You get a Free Bead Runway!! and 12×12 iris case! we are going to learn how to layout a graduating size bead pattern in a way that you can make a pattern of your own, using your own beads in the future) (THIS CLASS IS A REVOLUTION IN KUMIHIMO PATTERN LAYOUT AND DESIGN, YOU will never be the same again after this class.)
  • You need to bring: 2 part epoxy
  • You will be choosing your necklace length and there will be three options for the extender
Specific to Seafoam and Sand Sea turtle:
  • There’s a choice to be made in this class, do you want to make a 18″ necklace and matching bracelet -or- a 24″ necklace only?
  • You may have to see it to decide and that is fine.
  • Also, if you want your pendant to be removable, or interchangeable, I will have bails for sale that you can buy to make it as such.
Specific to Fairy Tales Class:
  • You need basic jewelry tools, round nose pliers, needle nose pliers, flat nose pliers
  • i will have additional pendants available day of class for purchase: silver teardrop and butterflies.


Also, If you take all three of my classes, I will give you a FREE signed copy of my new book!!!


Alternating Center Cords Kumihimo Technique

Alternating Cords Kumihimo Technique
IMAG2022_1
Purple Druzy Kumihimo Necklace
Challenge:
You want to incorporate beads with a bead hole size too small to string onto the cord you are currently using. (Example 1: Fresh water pearls usually won’t fit on commonly used c-lon Tex 210 (.5mm) cording).
Challenge:
You want to incorporate beads with a bead hole size so large that the cord you are currently using  doesn’t fill the bead hole space and as a result, the braid is loose and the cord is showing.
Solution:

In Kumihimo, braiding around a center core can add support to beads that tend to collapse into the center. The best results are achieved when the cording used, fills the bead holes as much as possible. Additionally, materials in the center cord can be alternated into the weave to allow for more options, such as a different cord thickness for a bead hole size that doesn’t fit on the cord being used, or as we will see in this week’s project, Purple Druzy, can be a source to alternate in multiple different types of cord while weaving mid-way through, to accommodate three different bead hole sizes and achieve a tight aesthetically pleasing braid.

For example, the small freshwater pearls will be strung on the black micro c-lon cording, because the hole openings are so tiny, they do not fit on the regular violet tex 210 c-lon cording. Also, the metal mesh beads have quite large hole openings, so we use two suede leather lace cords per bead. When these cords are not in use, they are braided around as part of the center core, until they are called for in the pattern.

The bead stringing portion of this project is handled differently than usual. Since certain beads will be strung on specific cording, the beads are strung in segmented sections depending on which cord is called for.

Bead Runway Layout
Bead Runway Layout

Tip 1 :

Before Alternating Cords, work unused cord into braid a bit before it is called on in the pattern. Do this by: when there is one bead left on each strand for the current section you are working, bring down the next alternating cord to be used and join it with the cords in use and continue braiding, picking up two cords as one, until the beads are gone. When beads are gone, separate unused cords, tie in a knot above the braid to prevent unraveling, and join with center core, until it is called on again.

Tip 2:

When using the thinner, Micro C-lon as an alternate cord, keep braiding two cords as one with the regular c-lon tex 210 cording to add more support., instead of joining it with the center core. This is optional but I suggest this method. Of course, always conceal as much visible cording as possible. Choices may vary depending on the project.

IMAG1970The cord setup may seem daunting in this Purple Druzy project, as pictured, but the final results are absolutely amazing! Purple Druzy Kumihimo Bead Kit Available Now!

IMAG2018_2Additional Reference Videos on Microsoft Sway:

Alternating Cords and Center Core Kumihimo Disc Setup
In Kumihimo, braiding around a center cord core can add support to beads that tend to collapse into the center. Additionally, materials in the center cord can be alternated into the weave t…
Go to this Sway

Purple Druzy Kumihimo Techniques

Alternating Cords and Center Core Kumihimo Disc Setup
In Kumihimo, braiding around a center cord core can add support to beads that tend to collapse into the center. Additionally, materials in the center cord can be alternated into the weave t…
Go to this Sway

Welcome to Your Bead Runway™

New Invention: Bead Runway™ (patent pending)

Do you find that your Kumihimo jewelry projects are limited to the patterns available? Do you find yourself wishing you had a way to incorporate all those lonely beads you have stockpiled, into your Kumihimo designs? Does it seem overwhelming to figure out how to plan out 8 rows of beads before you string them on your Kumihimo disk?

You are in luck, because here is an invention that was created out of necessity. The Bead Runway™ (Patent Pending) is featured in Grayson’s Kumihimo class series, in order to teach students how to visually layout their beads and create Kumihimo patterns of their own. During the class series, students use the Bead Runway to layout all the beads in their patterns before they string their beads. They are then encouraged to write notes in their beading journal that are used to deconstruct every design they make. By the end of the class series, students have done enough deconstruction and note taking to pull from all their favorite parts to make a pattern of their own.

See Blog article: Get a Bead Journal!

Bead Runway™ limited edition summer swatches available Now!
A sneak peak at the new limited edition Bead Runway™ swatches, available this summer!

The Bead Runway is labeled three different ways so it can lend itself to any existing pattern. There are 8 runways and they are labeled 1-8, A-H and top two and bottom two. There is a ruler on the side so the designer can start to get a feel of how many beads per inch it takes to create a certain finished beaded length. Previously, the Bead Runway was only available to students who took the class series, but now it can be ordered online Now!

Bead Runway Loyout

Grayson is currently working on publishing a book containing her class series in print (pre-order available) and is also booking tour dates to appear at bead shows around the country, including BeadFest Philly August 2018 and Intergalactic Bead Shows. Register now!

Graduating Has Never Been Easier

Graduating bead sizes that is! In Kumihimo pattern design, learning how to graduate bead sizes to achieve  visually pleasing finished piece of jewelry is one of the necessary skills taught by instructor, Cindy Grayson.

The necklaces pictured below are made from the same pattern. The pattern features four strands of provided beads and four strands of “Beader’s Choice” beads, which come together to create a new result every time and to help teach the student how to start to make their own patterns.

A Bead Runway Basics & Beyond© Technique Pattern: Beader's Choice
Beader’s Choice Pattern. Technique: Graduating Bead Sizes, planning your own pattern using Bead Runway layout, 2-color spiral
Beader's Cooice Bead Layout on the Bead Runway™
Students begin the bead layout starting with the largest beads in the center

For a 2-Color Spiral:

Choose two colors, blue and black. Black will fill one board (Warps A, B, C, D) The second board (Warps E, F, G, H) will be Beader’s Choice (blue)!

Beader’s Choice Beads:

You will need 4-6 Focal Beads can range (12-6mm); Graduating size round beads 2-3 different sizes (6-4mm) and 6/o Seed Beads

Approximately 30-40 beads total per warp, depending on if you want a choker with extender chain or a full length necklace. Extra Seed Beads are good for extending the sides for a full length version, which would have more like 65-80 beads total per warp.

Students begin the bead layout starting with the largest beads in the center, then count the same amount of beads, decreasing in size, in both directions

Laying Out on Bead Runway™

Start with the largest focal beads and place in center of each warp on Board 2 (E-H). Find the similar sized black bead within 1mm +/-  and place same amount of black beads in center of Board 1 (A-D). 

Earth & Sea Kumihimo DIY Kit Designed by Cindy Grayson
Technique: Graduating Bead Sizes. Earth & Sea Graduating Pattern & Kumihimo DIY Kit Designed by Cindy Grayson
Earth & Sea Graduated Kumihimo Bead Pattern layout on the Bead Runway™

Know when to Omit beads:

When graduating size out from the center, each bead type has to be in multiples of 8 (ex: 8, 16, 24, 32, etc.) in order to be used (4 to left of the center, and 4 to right of the center. Omit any extra and go to next sized bead.  Exception: Focal beads can be a multiple of 4, because its placement is in the center.

See Blog article: When to use a center cord

Pattern and Kits to Try: These patterns and DIY Kits are available for purchase at MadeYouLookDesign.com

For updates and articles: subscribe to my BLOG on Beadrunway.com and LIKE Facebook Page: CindyGraysonJewelry

Grayson teaches Bead Runway Basics & Beyond Kumihimo Techniques© 2017 an 8-class cumulative series that introduces a new skill with every class.

She explains

“My goal is to teach my students enough basic Kumihimo techniques during the series, so afterward they can begin to create their own custom patterns to accommodate their own beads.”

Quotes:

“I am finally able to use my own beads in my own bead layout patterns.” —student

“This makes it so easy to visually count out and graduate my bead sizes. I love it! ” —student

“I can finally stop spending money on Kumihimo patterns because now I make MY OWN! My designs are so much more elaborate! ” —student

Important Links:

Purchase Bead Runway™ Technique Patterns & Kits: MadeYouLookDesign.com

Subscribe to Bead Runway™ Info and Blog

Purchase New Limited Edition Bead Runway™ Summer Swatches!!

Meet the Author

Cindy Grayson
Designer, Instructor and Inventor of the BeadRunway™ (patent pending)

I graduated in 2001 with a BFA. I am a graphic designer by trade. Ultimately, I am an artist. I can honestly say I have just about done it all. I needed a new challenge in jewelry making. How many times and ways can I string a bead on a wire? How can I use all of these beads I have stockpiled?

While working part time at Michael’s Arts and Crafts, I stumbled upon a Kumihimo Book with a picture of a stunningly different piece of jewelry on the cover. As I opened the book to take a gander, I realized there was an elevated level of sophistication to the Kumihimo pattern process that involved detailed planning and mathematics. As an artists that naturally uses both sides of my brain, I was hooked. I read as many patterns and made as many test projects as I could find. From day one, I kept a Kumihimo beading journal where I recorded exact specifications of each project, the bead sizes, how the different bead sizes fit together, the different cord and bead placements to get desired results, successes, failures and edits. Out of necessity, I created a bead layout board with eight runways to assist in visually planning and designing bead layouts. It also helped me to perfectly count out the various different bead types, which is paramount in obtaining a successful design.

After about six months of study, I started getting compliments. People wanted to learn how to create this beautiful jewelry and I felt I really had something great to share. I spent months developing an eight class series that covered all the basic skills and Kumihimo braiding techniques that I felt were necessary for my students to learn, with the hope that their abilities would be elevated in a way that they would no longer be a slave to the limited patterns currently available. I wanted them to know so much more was possible. I wanted them to be able to look at a piece of Kumihimo jewelry and be able to de-code and re-create it just by looking at it.  

I feel the Bead Runway™ (Patent Pending) and basic skills learned through my Bead Runway Basics & Beyond Kumihimo Techniques© 2017  Class Series will revolutionize the way students approach and get results from Contemporary Beaded Kumihimo and Pattern Layout and Design.